> ## Documentation Index
> Fetch the complete documentation index at: https://aletyx.ai/docs/llms.txt
> Use this file to discover all available pages before exploring further.
# Authoring – Models
> Guides covering the lifecycle of a decision model in the authoring editor: creating, importing, organizing, syncing, and publishing.
These guides cover the lifecycle of a decision model in the authoring editor: creating, importing, organizing, syncing, and publishing. All require Authoring access.
## The Authoring home
When you open Authoring, you land on the home page below. It's where every model starts — either from scratch, from an existing source, or by reopening recent work.
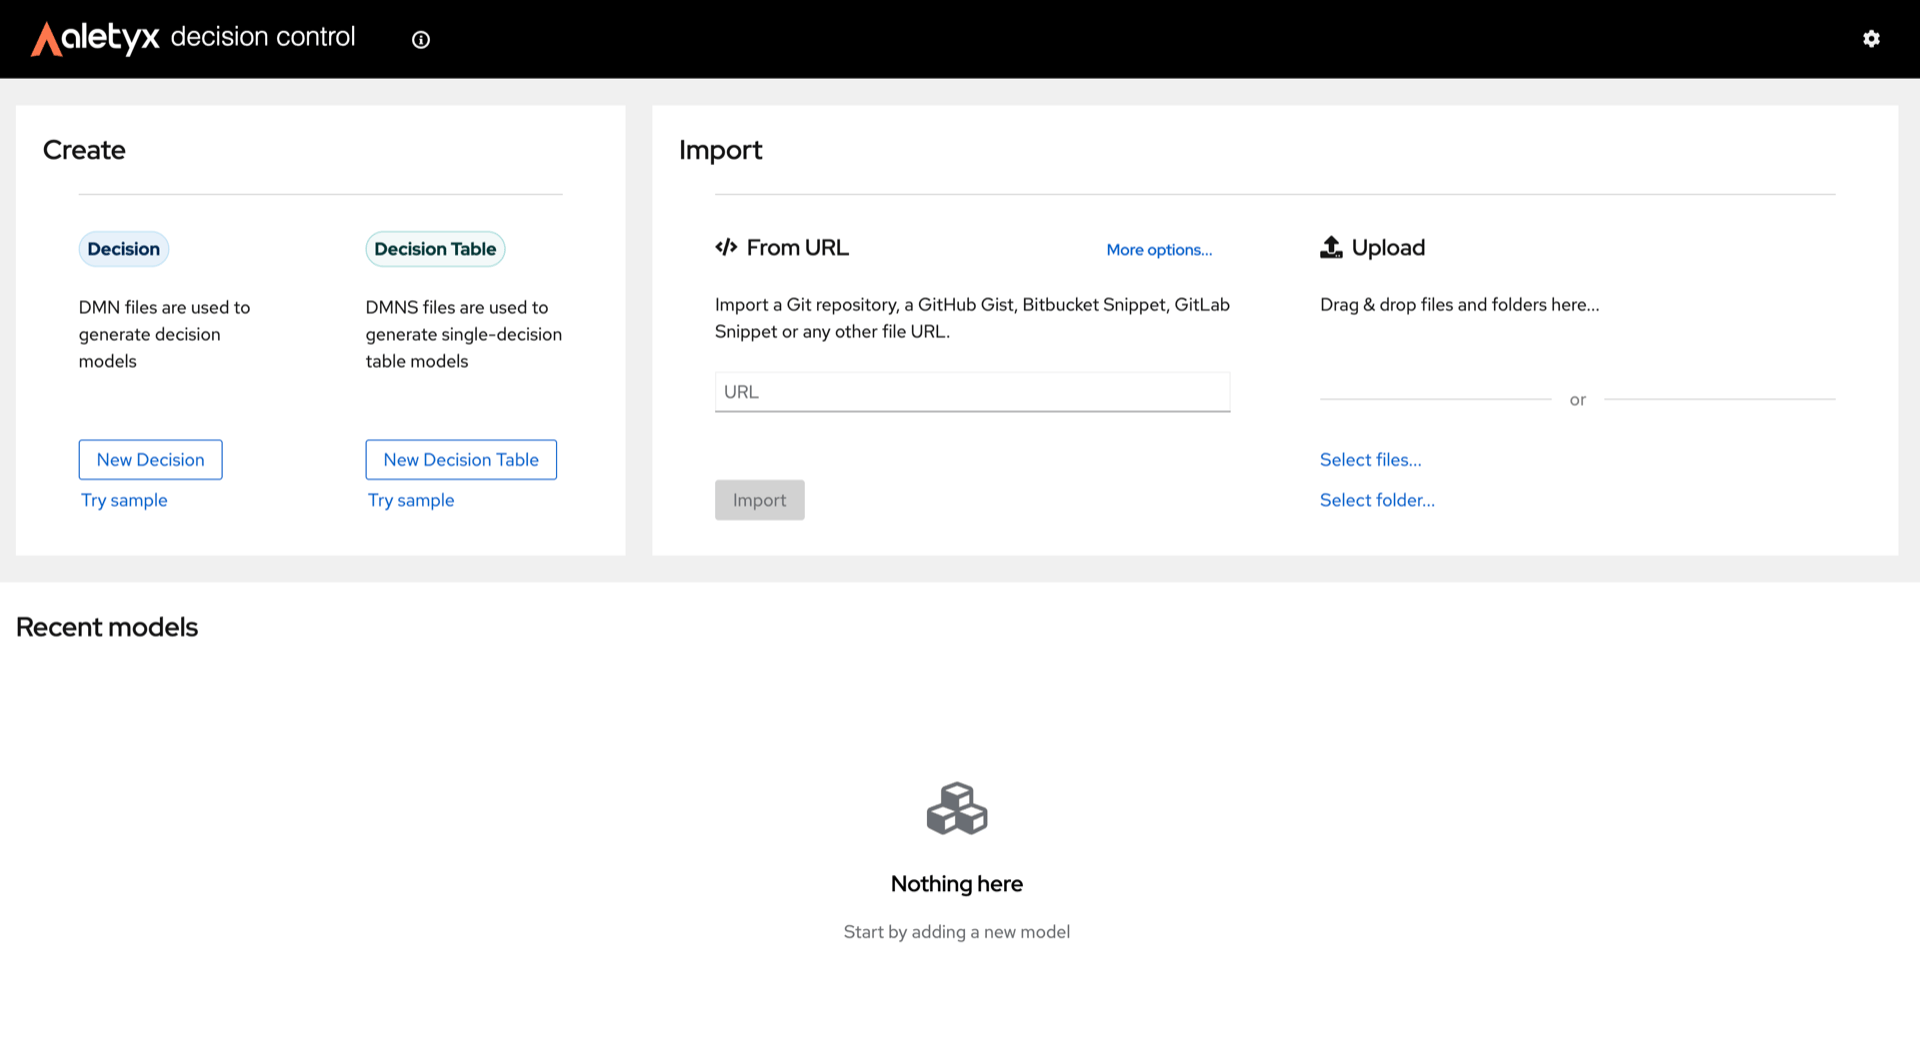 The page has three areas, plus the masthead at the top:
* **Create** — start a brand-new model. Pick **New Decision** for a full DMN model (`.dmn`, multiple decisions and a diagram) or **New Decision Table** for a single decision-table model (`.dmns`). The **Try sample** link under each opens a ready-made example instead of a blank file.
* **Import** — bring in a model that already exists. Use **From URL** to import a Git repository, GitHub Gist, Bitbucket/GitLab snippet, or any file URL (**More options…** lets you choose a branch, auth session, or encoding). Use **Upload** to drag in local files/folders or pick them with **Select files…** / **Select folder…**.
* **Recent models** — your previously opened workspaces. When empty it shows "Nothing here"; otherwise each workspace appears as a card you can reopen or manage.
* **Masthead** — the top bar with the Decision Control logo, an info icon, and the gear icon that opens the global **Settings** (Git Providers, Theme, AI Assistant).
The how-tos below walk through each of these actions.
## The editor toolbar
Most model actions start from the toolbar at the top of the editor. The numbered callouts match the screenshot below.
The page has three areas, plus the masthead at the top:
* **Create** — start a brand-new model. Pick **New Decision** for a full DMN model (`.dmn`, multiple decisions and a diagram) or **New Decision Table** for a single decision-table model (`.dmns`). The **Try sample** link under each opens a ready-made example instead of a blank file.
* **Import** — bring in a model that already exists. Use **From URL** to import a Git repository, GitHub Gist, Bitbucket/GitLab snippet, or any file URL (**More options…** lets you choose a branch, auth session, or encoding). Use **Upload** to drag in local files/folders or pick them with **Select files…** / **Select folder…**.
* **Recent models** — your previously opened workspaces. When empty it shows "Nothing here"; otherwise each workspace appears as a card you can reopen or manage.
* **Masthead** — the top bar with the Decision Control logo, an info icon, and the gear icon that opens the global **Settings** (Git Providers, Theme, AI Assistant).
The how-tos below walk through each of these actions.
## The editor toolbar
Most model actions start from the toolbar at the top of the editor. The numbered callouts match the screenshot below.
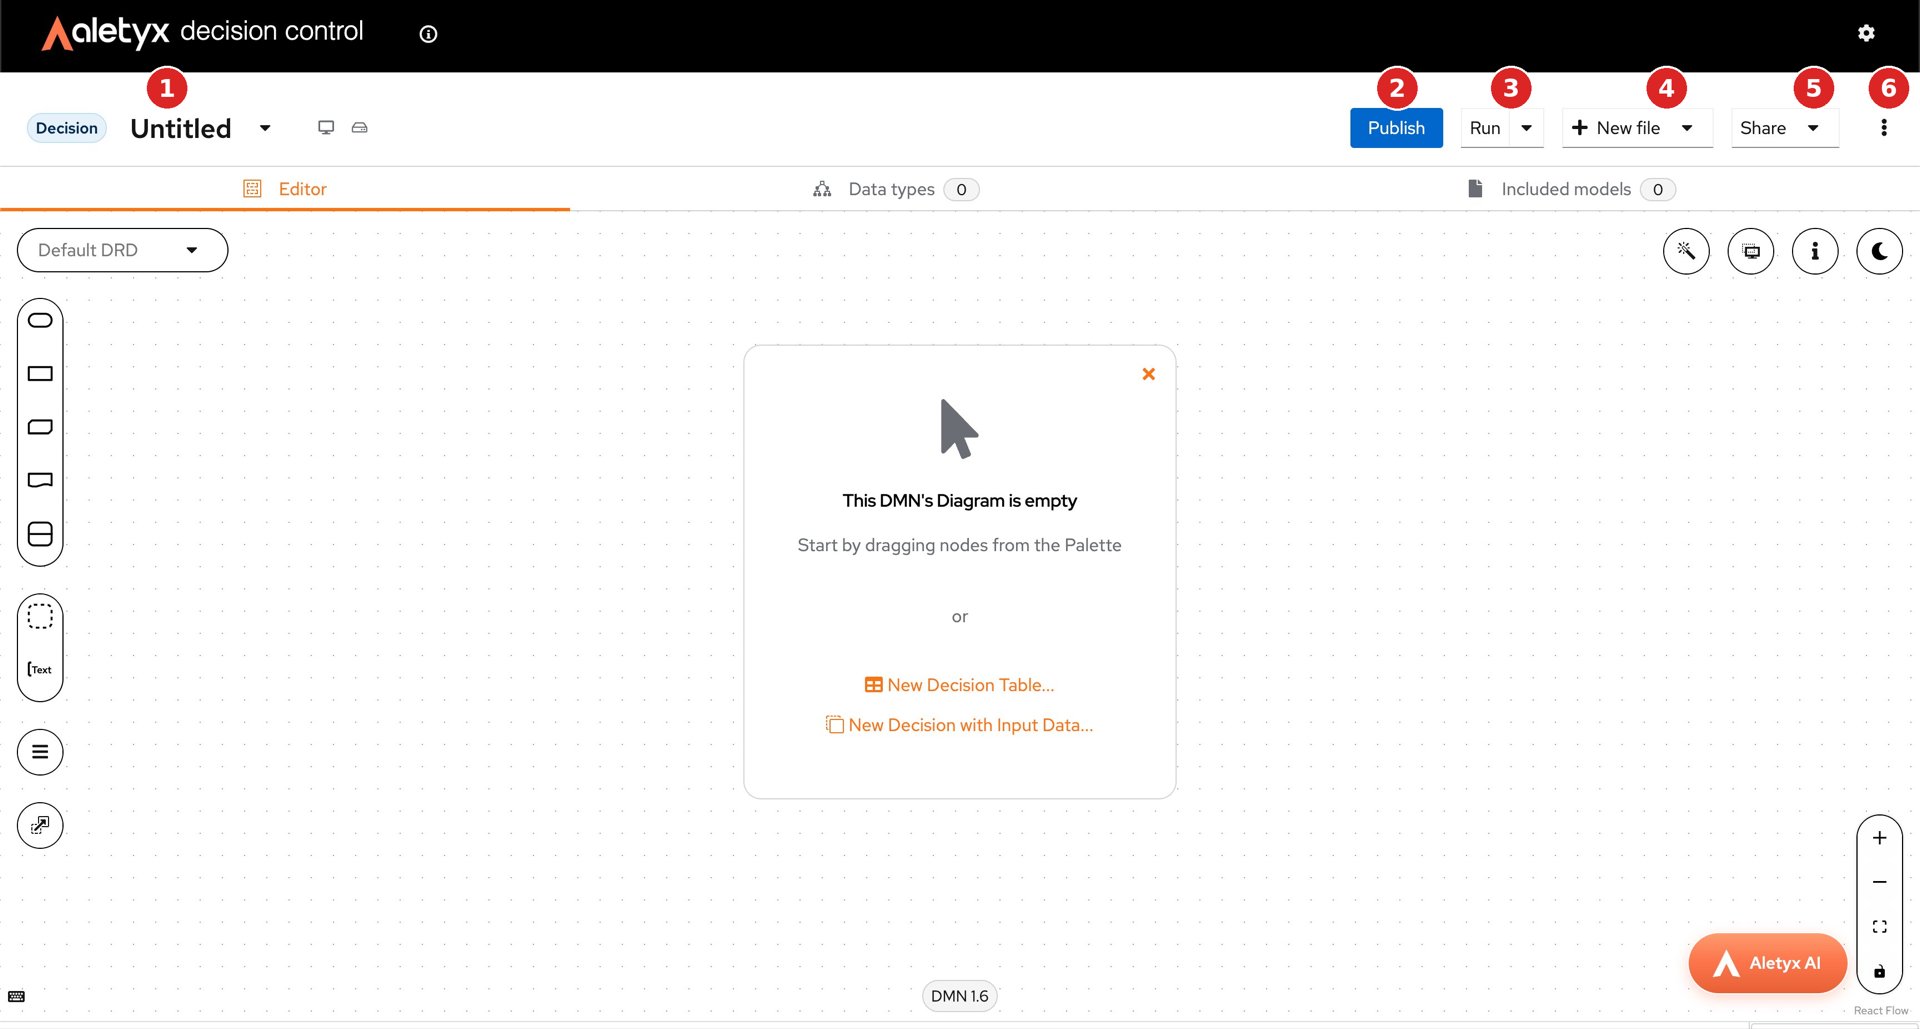 | # | Control | Used for |
| - | -------------------------- | ------------------------------------------------------------------------------------------------------------------------------------------------------- |
| 1 | File name (**Untitled ▾**) | Rename the file inline, or switch files in the workspace. The **Decision** chip to its left shows the file type (a DMNS file shows **Decision Table**). |
| 2 | **Publish** | Deploy the model as an executable API endpoint. |
| 3 | **Run** ▾ | Open the DMN Runner to test the model. |
| 4 | **+ New file** ▾ | Add another file to the workspace. |
| 5 | **Share** ▾ | Download (current file / SVG / workspace ZIP) or embed; in Git-backed workspaces, Sync (push/pull) appears here too. |
| 6 | **⋮** (kebab) | Extra actions: Commit, delete the file, and more. |
## The editor canvas
The **Editor** tab holds the diagram canvas — the visual surface where the decision model is built. The rest of the screen wraps around it:
### Model tabs
Three tabs across the top group the model's content:
* **Editor** — the diagram itself (the canvas described below).
* **Data types** — the structures, lists, and enumerations the model's inputs and outputs use. The count in the tab badge is the number of types defined.
* **Included models** — other DMN or PMML models reused inside this one. The count is the number of currently included models.
### Palette (node types)
The strip on the left edge holds the DMN node types. Drag any of them onto the canvas:
| Node | What it represents |
| ---------------------------------- | --------------------------------------------------------------------------------------------------------------------------------- |
| **Input Data** | A piece of input data the model receives (e.g., `loanAmount`). |
| **Decision** | A decision whose output is computed from inputs and/or other decisions. Holds the logic (decision table, FEEL expression, etc.). |
| **Business Knowledge Model (BKM)** | Reusable business logic (a function) called from one or more decisions. |
| **Knowledge Source** | A reference to an external authority that informs a decision (a regulation, document, person). Documentation only — not executed. |
| **Decision Service** | A bundle of decisions exposed as a single executable unit (the deployable surface for that subset of the DRD). |
| **Group** | A visual container to group related nodes on the diagram. Documentation only. |
| **Text Annotation** | A free-text note attached to a node. Documentation only. |
### Default DRD
A **Decision Requirements Diagram** (DRD) is one view of the decision model. The **Default DRD ▾** selector at the top-left switches between diagrams — large models can split their logic across several DRDs (for example, one per business sub-process).
### Empty-state shortcuts
On a blank model, the canvas shows two scaffolding shortcuts so you don't have to drag from the palette to start:
* **New Decision Table…** — creates a Decision node with a Decision Table already filled in, ready for you to add rows.
* **New Decision with Input Data…** — creates a Decision node connected to one or more Input Data nodes, with the logic stubbed out.
### Canvas tools
The circular buttons in the top-right corner are diagram utilities:
* **Auto-arrange** — re-runs the layout so nodes don't overlap.
* **Preview** — opens a preview of the rendered diagram.
* **Properties / info** — shows model-level metadata (name, namespace, etc.).
* **Theme** — toggles between light and dark themes for the editor.
The bottom-right cluster handles canvas navigation: **zoom in**, **zoom out**, **fit to screen**, and **lock** (prevent accidental edits). The **DMN 1.6** badge at the bottom shows the DMN specification version the editor produces.
## How to create a new model
Start a blank decision model in the editor.
**Steps:**
1. Open **Authoring**.
2. In the **Create** section, click **New Decision** for a full DMN model, or **New Decision Table** for a single decision-table (DMNS) model.
**Verify:** The editor opens with an empty canvas and the new file name in the toolbar.
## How to try a sample model
Open a ready-made example to explore DMN features.
**Steps:**
1. Open **Authoring**.
2. In the **Create** section, click **Try sample** under **Decision** or **Decision Table**.
**Verify:** The editor opens populated with the sample model.
## How to import an existing model
Bring a model that already exists into Decision Control — either from a Git source by URL, or by uploading files from your computer.
**Prerequisites:** Authoring access. For private sources (a protected repo, gist, or snippet), a Git account configured in **⚙ Settings → Git Providers**. What you import must contain a supported model file: `.dmn` (Decision) or `.dmns` (Decision Table). The editor also recognizes `.bpmn`, `.bpmn2`, and `.pmml`.
The address in the **From URL** card is detected automatically and can be a Git repository (any host — cloned in full), a GitHub repo or single file, a GitHub Gist, a Bitbucket repo/Snippet/file, a GitLab repo/Snippet/file, or any other direct file URL.
1. Open **Authoring** and find the **From URL** card.
2. Paste the address into the **URL** field.
3. (Optional) Click **More options…** to choose the Git branch/ref, the authentication session (Git account), whether to skip TLS certificate validation, or the encoding.
4. Click the action button — its label depends on the source: **Clone** for a Git repository (brings the full history) or **Import** for a single file / Gist / Snippet.
The button stays disabled until the URL is valid; on error, a red message appears below the field.
You can upload one or more individual files (**Select files…**, multi-select), an entire folder including subfolders (**Select folder…**), or drag and drop files/folders onto the drop area. There is no extension filter on upload — you can bring a whole project, but only supported model files open in the editor.
1. In **Authoring**, go to the **Upload** card.
2. Drag files/folders onto **Drag & drop files and folders here…**, or click **Select files…** / **Select folder…**.
**Verify:** A workspace is created and the model opens in the DMN editor. It also appears under **Recent models** on the Authoring home (replacing the "Nothing here" empty state).
Importing only creates a local workspace in your browser. Versioning (**Commit**), syncing with Git (**Sync**), and publishing (**Publish**) happen afterward, inside the editor. The **Clone** vs **Import** distinction is only the button label: Clone brings the Git repository and its history; Import brings a standalone file or snippet.
## How to open a recent model
Reopen a model you worked on before.
**Prerequisites:** At least one existing workspace.
**Steps:**
1. Open **Authoring**.
2. In **Recent models**, click the workspace card (expand it to pick a specific file).
**Verify:** The selected model opens in the editor.
## How to delete a model
Remove a workspace and its files you no longer need.
**Steps:**
1. Open **Authoring**.
2. On the workspace card in **Recent models**, open the kebab (⋮) menu.
3. Click **Delete** and confirm in the dialog.
**Verify:** The workspace card disappears from Recent models.
## How to rename a file
Change the name of the model file you're editing.
**Prerequisites:** A file open in the editor.
**Steps:**
1. In the editor toolbar, click the file-name field (left side).
2. Type the new name and press Enter (press Esc to cancel).
**Verify:** The toolbar shows the new name; an error tooltip appears only if the name conflicts or is invalid.
## How to add a new file to the workspace
Add another model or supported file to the current workspace.
**Steps:**
1. In the editor toolbar, click **New file**.
2. Choose a file type from the dropdown (or import from URL/upload).
**Verify:** The new file opens and appears in the file switcher.
## How to switch between files in a workspace
Navigate among the files in the current workspace.
**Prerequisites:** A workspace with multiple files.
**Steps:**
1. Click the file switcher (file-name area) in the toolbar.
2. (Optional) Search, sort, toggle list/carousel view, or check **Only modified**.
3. Click the file you want.
**Verify:** The editor switches to the chosen file.
## How to add nodes to the diagram
Build the decision model by placing nodes on the canvas, naming and typing them, and wiring them together.
**Prerequisites:** A model open on the **Editor** tab.
### Add a node
1. From the **palette** on the left edge, drag the node type you need onto the canvas (see [the palette table above](#palette-node-types) for what each type represents).
2. Click the node to give it a clear name (e.g., `Applicant Age`, `Approved Amount`).
3. Set its **type** in the node's properties — either a built-in type (`number`, `string`, `boolean`, `date`, …) or a [custom data type](#how-to-define-data-types).
### Connect nodes
Decisions consume data from other nodes; you express that with an arrow:
1. Hover the source node until its edge handles appear.
2. Drag from the source's edge to the target node — the editor draws the right kind of arrow automatically:
* **Input Data → Decision** or **Decision → Decision** = *Information Requirement*
* **BKM → Decision** = *Knowledge Requirement*
* **Knowledge Source → Decision/BKM** = *Authority Requirement*
### Define a decision's logic
Each **Decision** node needs a way to compute its output. Open the decision (click its body) and choose one of the standard DMN expression forms:
* **Decision Table** — rows of conditions/actions. The most common form; rules are easy to read and audit.
* **Literal expression** — a single FEEL expression.
* **Context** — a set of named entries (a small record) where the last entry is the result.
* **Function definition** — used inside BKMs; declares parameters and a body.
* **Invocation** — calls a BKM with a set of named arguments.
* **Relation** — a table-like list of records.
* **List** — an ordered list of expressions.
**Scaffold from the empty state**
On a blank model you can skip the palette and click **New Decision Table…** or **New Decision with Input Data…** on the canvas — both shortcuts produce a complete starting structure (a typed decision plus the relevant inputs).
**Verify:** The nodes appear on the canvas, the arrows reflect the requirements you drew, each decision shows its expression form, and the "This DMN's Diagram is empty" card is gone.
## How to define data types
Declare the shape of the data your inputs, decisions, and outputs use. Custom types make models easier to read, catch typos at design time, and keep test data consistent.
**Prerequisites:** A model open in the editor.
### What you can build
Every type extends one of the DMN **built-in (base) types**:
`string`, `number`, `boolean`, `date`, `time`, `date and time`, `days and time duration`, `years and months duration`, `Any` (no specific type).
On top of those, you can compose three custom shapes:
* **Structure** — a composite record with named fields, each with its own type. Example: an `Applicant` structure with `name: string`, `age: number`, `address: Address`.
* **List** — an ordered, repeated value of a single type. Example: a `List of Income` (a list of `number`).
* **Enumeration** — a fixed, named set of allowed values. Example: a `Risk` type that may only be `LOW`, `MEDIUM`, or `HIGH`.
Types can reference each other — a `Loan` structure can have an `applicant` field of type `Applicant`.
### Steps
1. Open the **Data types** tab.
2. Add a new type and give it a clear name (use PascalCase, e.g., `Applicant`).
3. Pick the base type or shape:
* For a **Structure**, add each field with a name and type.
* For a **List**, pick the item type.
* For an **Enumeration**, list the allowed values.
4. (Optional) Add **constraints** to restrict valid values — for example, a range on a number (`0..120`), a regex on a string, or a date window.
### Use the type
Once defined, the type appears wherever you set a node's type — on **Input Data**, **Decision**, and **BKM** parameter/result types — and it shows up automatically in the [DMN Runner](/docs/decision-control/how-to/authoring-testing) form so you can test against it.
**Verify:** The new type is selectable when typing nodes; the **Data types** tab count increases by one.
## How to include another model
Reuse decisions and definitions from another model without copying them. Useful for sharing common logic (e.g., a `creditScore` BKM) or for plugging predictive models into a decision flow.
**Prerequisites:** A model open in the editor; the model you want to include is in the same workspace.
### What you can include
* **DMN** — pulls in the other model's **Decisions**, **BKMs**, and **Data types** so you can call/reference them from the current model.
* **PMML** — pulls in a predictive model (e.g., a regression or classification) so it can be invoked from a DMN decision through a BKM.
### Steps
1. Open the **Included models** tab.
2. Add the DMN or PMML model to include and give it an **alias** (the prefix you'll use in expressions, e.g., `risk` for a model that exposes a `score` BKM → referenced as `risk.score(...)`).
3. (DMN) The included model's types, decisions, and BKMs become available throughout the current model — for example, when picking a type for a node or invoking a BKM from a decision.
4. (PMML) Wrap the predictive model in a BKM that invokes it; the BKM can then be used inside any decision.
**Alias matters**
The alias namespaces the included content. Pick something short and meaningful — you'll see it on every reference and in test inputs.
### Remove an inclusion
To stop referencing an external model, remove it from the **Included models** tab. The editor flags any node that still depends on the removed alias so you can clean them up.
**Verify:** Included types and BKMs are selectable in the editor; the **Included models** tab count increases by one.
## How to commit changes (create a save point)
Capture a local snapshot of your changes.
**Prerequisites:** Unsaved local changes.
**Steps:**
1. In the editor toolbar, open the kebab (⋮) menu.
2. Click **Commit**.
**Verify:** A "Commit created" message appears and the modified indicator clears.
## How to sync with a Git repository
Push, pull, or update a Git-backed workspace.
**Prerequisites:** A Git-backed workspace (the Sync options are absent for local-only workspaces) and a configured Git provider account.
**Steps:**
1. In the editor toolbar, open the **Share** menu.
2. Choose **Push to Git Repository**, **Pull from Git Repository**, or **Update Gist/Snippet**.
**Verify:** The sync completes without an error alert; remote state reflects your changes.
## How to download a model
Export the current file, an SVG image, or the whole workspace.
**Prerequisites:** A file open.
**Steps:**
1. In the toolbar, open the **Share** menu → **Download**.
2. Pick **Current file**, the SVG image item, or **All files (ZIP)**.
**Verify:** The browser downloads the `.`, `.svg`, or `.zip` file.
## How to embed a model
Generate an embeddable view of the model for another site.
**Prerequisites:** A file open.
**Steps:**
1. In the toolbar, open the **Share** menu → **Other → Embed…**.
2. Configure the options in the dialog and copy the embed snippet.
**Verify:** The embed dialog shows a snippet you can copy.
## How to delete the current file
Remove the file currently open in the editor.
**Steps:**
1. In the toolbar, open the kebab (⋮) menu.
2. Click **Delete ``** and confirm.
**Verify:** The file closes; if it was the last file, you return to the Authoring home.
## How to publish (deploy) a model
Deploy a decision model so it becomes an executable API endpoint.
**Prerequisites:** Authoring access **and** Publish access.
**When Publish is disabled**
The **Publish** button is greyed out in three cases:
* You lack Publish access — tooltip: *"Publish not allowed…"*
* There are unresolved AI diff changes — tooltip: *"Resolve pending changes before publishing"*
* An AI request is in flight — tooltip: *"Wait for the current request to finish"*
Resolve those first.
**Steps:**
1. With the model open, click **Publish** (top-right of the toolbar).
2. In the **Deploy** dialog, confirm and optionally choose to activate the deployed models.
**Verify:** The deploy dialog reports success and offers to activate the published models.
| # | Control | Used for |
| - | -------------------------- | ------------------------------------------------------------------------------------------------------------------------------------------------------- |
| 1 | File name (**Untitled ▾**) | Rename the file inline, or switch files in the workspace. The **Decision** chip to its left shows the file type (a DMNS file shows **Decision Table**). |
| 2 | **Publish** | Deploy the model as an executable API endpoint. |
| 3 | **Run** ▾ | Open the DMN Runner to test the model. |
| 4 | **+ New file** ▾ | Add another file to the workspace. |
| 5 | **Share** ▾ | Download (current file / SVG / workspace ZIP) or embed; in Git-backed workspaces, Sync (push/pull) appears here too. |
| 6 | **⋮** (kebab) | Extra actions: Commit, delete the file, and more. |
## The editor canvas
The **Editor** tab holds the diagram canvas — the visual surface where the decision model is built. The rest of the screen wraps around it:
### Model tabs
Three tabs across the top group the model's content:
* **Editor** — the diagram itself (the canvas described below).
* **Data types** — the structures, lists, and enumerations the model's inputs and outputs use. The count in the tab badge is the number of types defined.
* **Included models** — other DMN or PMML models reused inside this one. The count is the number of currently included models.
### Palette (node types)
The strip on the left edge holds the DMN node types. Drag any of them onto the canvas:
| Node | What it represents |
| ---------------------------------- | --------------------------------------------------------------------------------------------------------------------------------- |
| **Input Data** | A piece of input data the model receives (e.g., `loanAmount`). |
| **Decision** | A decision whose output is computed from inputs and/or other decisions. Holds the logic (decision table, FEEL expression, etc.). |
| **Business Knowledge Model (BKM)** | Reusable business logic (a function) called from one or more decisions. |
| **Knowledge Source** | A reference to an external authority that informs a decision (a regulation, document, person). Documentation only — not executed. |
| **Decision Service** | A bundle of decisions exposed as a single executable unit (the deployable surface for that subset of the DRD). |
| **Group** | A visual container to group related nodes on the diagram. Documentation only. |
| **Text Annotation** | A free-text note attached to a node. Documentation only. |
### Default DRD
A **Decision Requirements Diagram** (DRD) is one view of the decision model. The **Default DRD ▾** selector at the top-left switches between diagrams — large models can split their logic across several DRDs (for example, one per business sub-process).
### Empty-state shortcuts
On a blank model, the canvas shows two scaffolding shortcuts so you don't have to drag from the palette to start:
* **New Decision Table…** — creates a Decision node with a Decision Table already filled in, ready for you to add rows.
* **New Decision with Input Data…** — creates a Decision node connected to one or more Input Data nodes, with the logic stubbed out.
### Canvas tools
The circular buttons in the top-right corner are diagram utilities:
* **Auto-arrange** — re-runs the layout so nodes don't overlap.
* **Preview** — opens a preview of the rendered diagram.
* **Properties / info** — shows model-level metadata (name, namespace, etc.).
* **Theme** — toggles between light and dark themes for the editor.
The bottom-right cluster handles canvas navigation: **zoom in**, **zoom out**, **fit to screen**, and **lock** (prevent accidental edits). The **DMN 1.6** badge at the bottom shows the DMN specification version the editor produces.
## How to create a new model
Start a blank decision model in the editor.
**Steps:**
1. Open **Authoring**.
2. In the **Create** section, click **New Decision** for a full DMN model, or **New Decision Table** for a single decision-table (DMNS) model.
**Verify:** The editor opens with an empty canvas and the new file name in the toolbar.
## How to try a sample model
Open a ready-made example to explore DMN features.
**Steps:**
1. Open **Authoring**.
2. In the **Create** section, click **Try sample** under **Decision** or **Decision Table**.
**Verify:** The editor opens populated with the sample model.
## How to import an existing model
Bring a model that already exists into Decision Control — either from a Git source by URL, or by uploading files from your computer.
**Prerequisites:** Authoring access. For private sources (a protected repo, gist, or snippet), a Git account configured in **⚙ Settings → Git Providers**. What you import must contain a supported model file: `.dmn` (Decision) or `.dmns` (Decision Table). The editor also recognizes `.bpmn`, `.bpmn2`, and `.pmml`.
The address in the **From URL** card is detected automatically and can be a Git repository (any host — cloned in full), a GitHub repo or single file, a GitHub Gist, a Bitbucket repo/Snippet/file, a GitLab repo/Snippet/file, or any other direct file URL.
1. Open **Authoring** and find the **From URL** card.
2. Paste the address into the **URL** field.
3. (Optional) Click **More options…** to choose the Git branch/ref, the authentication session (Git account), whether to skip TLS certificate validation, or the encoding.
4. Click the action button — its label depends on the source: **Clone** for a Git repository (brings the full history) or **Import** for a single file / Gist / Snippet.
The button stays disabled until the URL is valid; on error, a red message appears below the field.
You can upload one or more individual files (**Select files…**, multi-select), an entire folder including subfolders (**Select folder…**), or drag and drop files/folders onto the drop area. There is no extension filter on upload — you can bring a whole project, but only supported model files open in the editor.
1. In **Authoring**, go to the **Upload** card.
2. Drag files/folders onto **Drag & drop files and folders here…**, or click **Select files…** / **Select folder…**.
**Verify:** A workspace is created and the model opens in the DMN editor. It also appears under **Recent models** on the Authoring home (replacing the "Nothing here" empty state).
Importing only creates a local workspace in your browser. Versioning (**Commit**), syncing with Git (**Sync**), and publishing (**Publish**) happen afterward, inside the editor. The **Clone** vs **Import** distinction is only the button label: Clone brings the Git repository and its history; Import brings a standalone file or snippet.
## How to open a recent model
Reopen a model you worked on before.
**Prerequisites:** At least one existing workspace.
**Steps:**
1. Open **Authoring**.
2. In **Recent models**, click the workspace card (expand it to pick a specific file).
**Verify:** The selected model opens in the editor.
## How to delete a model
Remove a workspace and its files you no longer need.
**Steps:**
1. Open **Authoring**.
2. On the workspace card in **Recent models**, open the kebab (⋮) menu.
3. Click **Delete** and confirm in the dialog.
**Verify:** The workspace card disappears from Recent models.
## How to rename a file
Change the name of the model file you're editing.
**Prerequisites:** A file open in the editor.
**Steps:**
1. In the editor toolbar, click the file-name field (left side).
2. Type the new name and press Enter (press Esc to cancel).
**Verify:** The toolbar shows the new name; an error tooltip appears only if the name conflicts or is invalid.
## How to add a new file to the workspace
Add another model or supported file to the current workspace.
**Steps:**
1. In the editor toolbar, click **New file**.
2. Choose a file type from the dropdown (or import from URL/upload).
**Verify:** The new file opens and appears in the file switcher.
## How to switch between files in a workspace
Navigate among the files in the current workspace.
**Prerequisites:** A workspace with multiple files.
**Steps:**
1. Click the file switcher (file-name area) in the toolbar.
2. (Optional) Search, sort, toggle list/carousel view, or check **Only modified**.
3. Click the file you want.
**Verify:** The editor switches to the chosen file.
## How to add nodes to the diagram
Build the decision model by placing nodes on the canvas, naming and typing them, and wiring them together.
**Prerequisites:** A model open on the **Editor** tab.
### Add a node
1. From the **palette** on the left edge, drag the node type you need onto the canvas (see [the palette table above](#palette-node-types) for what each type represents).
2. Click the node to give it a clear name (e.g., `Applicant Age`, `Approved Amount`).
3. Set its **type** in the node's properties — either a built-in type (`number`, `string`, `boolean`, `date`, …) or a [custom data type](#how-to-define-data-types).
### Connect nodes
Decisions consume data from other nodes; you express that with an arrow:
1. Hover the source node until its edge handles appear.
2. Drag from the source's edge to the target node — the editor draws the right kind of arrow automatically:
* **Input Data → Decision** or **Decision → Decision** = *Information Requirement*
* **BKM → Decision** = *Knowledge Requirement*
* **Knowledge Source → Decision/BKM** = *Authority Requirement*
### Define a decision's logic
Each **Decision** node needs a way to compute its output. Open the decision (click its body) and choose one of the standard DMN expression forms:
* **Decision Table** — rows of conditions/actions. The most common form; rules are easy to read and audit.
* **Literal expression** — a single FEEL expression.
* **Context** — a set of named entries (a small record) where the last entry is the result.
* **Function definition** — used inside BKMs; declares parameters and a body.
* **Invocation** — calls a BKM with a set of named arguments.
* **Relation** — a table-like list of records.
* **List** — an ordered list of expressions.
**Scaffold from the empty state**
On a blank model you can skip the palette and click **New Decision Table…** or **New Decision with Input Data…** on the canvas — both shortcuts produce a complete starting structure (a typed decision plus the relevant inputs).
**Verify:** The nodes appear on the canvas, the arrows reflect the requirements you drew, each decision shows its expression form, and the "This DMN's Diagram is empty" card is gone.
## How to define data types
Declare the shape of the data your inputs, decisions, and outputs use. Custom types make models easier to read, catch typos at design time, and keep test data consistent.
**Prerequisites:** A model open in the editor.
### What you can build
Every type extends one of the DMN **built-in (base) types**:
`string`, `number`, `boolean`, `date`, `time`, `date and time`, `days and time duration`, `years and months duration`, `Any` (no specific type).
On top of those, you can compose three custom shapes:
* **Structure** — a composite record with named fields, each with its own type. Example: an `Applicant` structure with `name: string`, `age: number`, `address: Address`.
* **List** — an ordered, repeated value of a single type. Example: a `List of Income` (a list of `number`).
* **Enumeration** — a fixed, named set of allowed values. Example: a `Risk` type that may only be `LOW`, `MEDIUM`, or `HIGH`.
Types can reference each other — a `Loan` structure can have an `applicant` field of type `Applicant`.
### Steps
1. Open the **Data types** tab.
2. Add a new type and give it a clear name (use PascalCase, e.g., `Applicant`).
3. Pick the base type or shape:
* For a **Structure**, add each field with a name and type.
* For a **List**, pick the item type.
* For an **Enumeration**, list the allowed values.
4. (Optional) Add **constraints** to restrict valid values — for example, a range on a number (`0..120`), a regex on a string, or a date window.
### Use the type
Once defined, the type appears wherever you set a node's type — on **Input Data**, **Decision**, and **BKM** parameter/result types — and it shows up automatically in the [DMN Runner](/docs/decision-control/how-to/authoring-testing) form so you can test against it.
**Verify:** The new type is selectable when typing nodes; the **Data types** tab count increases by one.
## How to include another model
Reuse decisions and definitions from another model without copying them. Useful for sharing common logic (e.g., a `creditScore` BKM) or for plugging predictive models into a decision flow.
**Prerequisites:** A model open in the editor; the model you want to include is in the same workspace.
### What you can include
* **DMN** — pulls in the other model's **Decisions**, **BKMs**, and **Data types** so you can call/reference them from the current model.
* **PMML** — pulls in a predictive model (e.g., a regression or classification) so it can be invoked from a DMN decision through a BKM.
### Steps
1. Open the **Included models** tab.
2. Add the DMN or PMML model to include and give it an **alias** (the prefix you'll use in expressions, e.g., `risk` for a model that exposes a `score` BKM → referenced as `risk.score(...)`).
3. (DMN) The included model's types, decisions, and BKMs become available throughout the current model — for example, when picking a type for a node or invoking a BKM from a decision.
4. (PMML) Wrap the predictive model in a BKM that invokes it; the BKM can then be used inside any decision.
**Alias matters**
The alias namespaces the included content. Pick something short and meaningful — you'll see it on every reference and in test inputs.
### Remove an inclusion
To stop referencing an external model, remove it from the **Included models** tab. The editor flags any node that still depends on the removed alias so you can clean them up.
**Verify:** Included types and BKMs are selectable in the editor; the **Included models** tab count increases by one.
## How to commit changes (create a save point)
Capture a local snapshot of your changes.
**Prerequisites:** Unsaved local changes.
**Steps:**
1. In the editor toolbar, open the kebab (⋮) menu.
2. Click **Commit**.
**Verify:** A "Commit created" message appears and the modified indicator clears.
## How to sync with a Git repository
Push, pull, or update a Git-backed workspace.
**Prerequisites:** A Git-backed workspace (the Sync options are absent for local-only workspaces) and a configured Git provider account.
**Steps:**
1. In the editor toolbar, open the **Share** menu.
2. Choose **Push to Git Repository**, **Pull from Git Repository**, or **Update Gist/Snippet**.
**Verify:** The sync completes without an error alert; remote state reflects your changes.
## How to download a model
Export the current file, an SVG image, or the whole workspace.
**Prerequisites:** A file open.
**Steps:**
1. In the toolbar, open the **Share** menu → **Download**.
2. Pick **Current file**, the SVG image item, or **All files (ZIP)**.
**Verify:** The browser downloads the `.`, `.svg`, or `.zip` file.
## How to embed a model
Generate an embeddable view of the model for another site.
**Prerequisites:** A file open.
**Steps:**
1. In the toolbar, open the **Share** menu → **Other → Embed…**.
2. Configure the options in the dialog and copy the embed snippet.
**Verify:** The embed dialog shows a snippet you can copy.
## How to delete the current file
Remove the file currently open in the editor.
**Steps:**
1. In the toolbar, open the kebab (⋮) menu.
2. Click **Delete ``** and confirm.
**Verify:** The file closes; if it was the last file, you return to the Authoring home.
## How to publish (deploy) a model
Deploy a decision model so it becomes an executable API endpoint.
**Prerequisites:** Authoring access **and** Publish access.
**When Publish is disabled**
The **Publish** button is greyed out in three cases:
* You lack Publish access — tooltip: *"Publish not allowed…"*
* There are unresolved AI diff changes — tooltip: *"Resolve pending changes before publishing"*
* An AI request is in flight — tooltip: *"Wait for the current request to finish"*
Resolve those first.
**Steps:**
1. With the model open, click **Publish** (top-right of the toolbar).
2. In the **Deploy** dialog, confirm and optionally choose to activate the deployed models.
**Verify:** The deploy dialog reports success and offers to activate the published models.