> ## Documentation Index
> Fetch the complete documentation index at: https://aletyx.ai/docs/llms.txt
> Use this file to discover all available pages before exploring further.
# Authoring – AI Assistant
> Use the in-editor AI Assistant to build, modify, and test decision models in natural language — it can edit the diagram, generate test inputs, and answer questions about the model.
The in-editor AI Assistant helps you build, modify, and test decision models in natural language — it can edit the diagram, generate test inputs, and answer questions about the model.
 **Required to use the assistant**
All how-tos on this page require:
* **Access:** Authoring
* **Deployment:** the AI Assistant must be enabled by your administrator
* **Credential:** a valid AI token configured in **Settings → AI Assistant**
**History is per workspace**
The assistant's chat history and pending queue are stored per workspace — switching to a different model shows that model's own conversation, not a single global one.
## How to open the AI Assistant panel
Open the in-editor assistant to get help building or analyzing a model.
**Steps:**
1. With a model open, click the floating **Aletyx AI** trigger button (bottom-right of the editor).
**Verify:** The assistant panel opens with a message box; if no token is set, a "no token" prompt appears instead.
## How to ask the AI Assistant to create or modify a model
Describe a change in natural language and let the assistant draft DMN edits.
**Prerequisites:** AI Assistant panel open and a valid AI token (**Settings → AI Assistant**).
**Steps:**
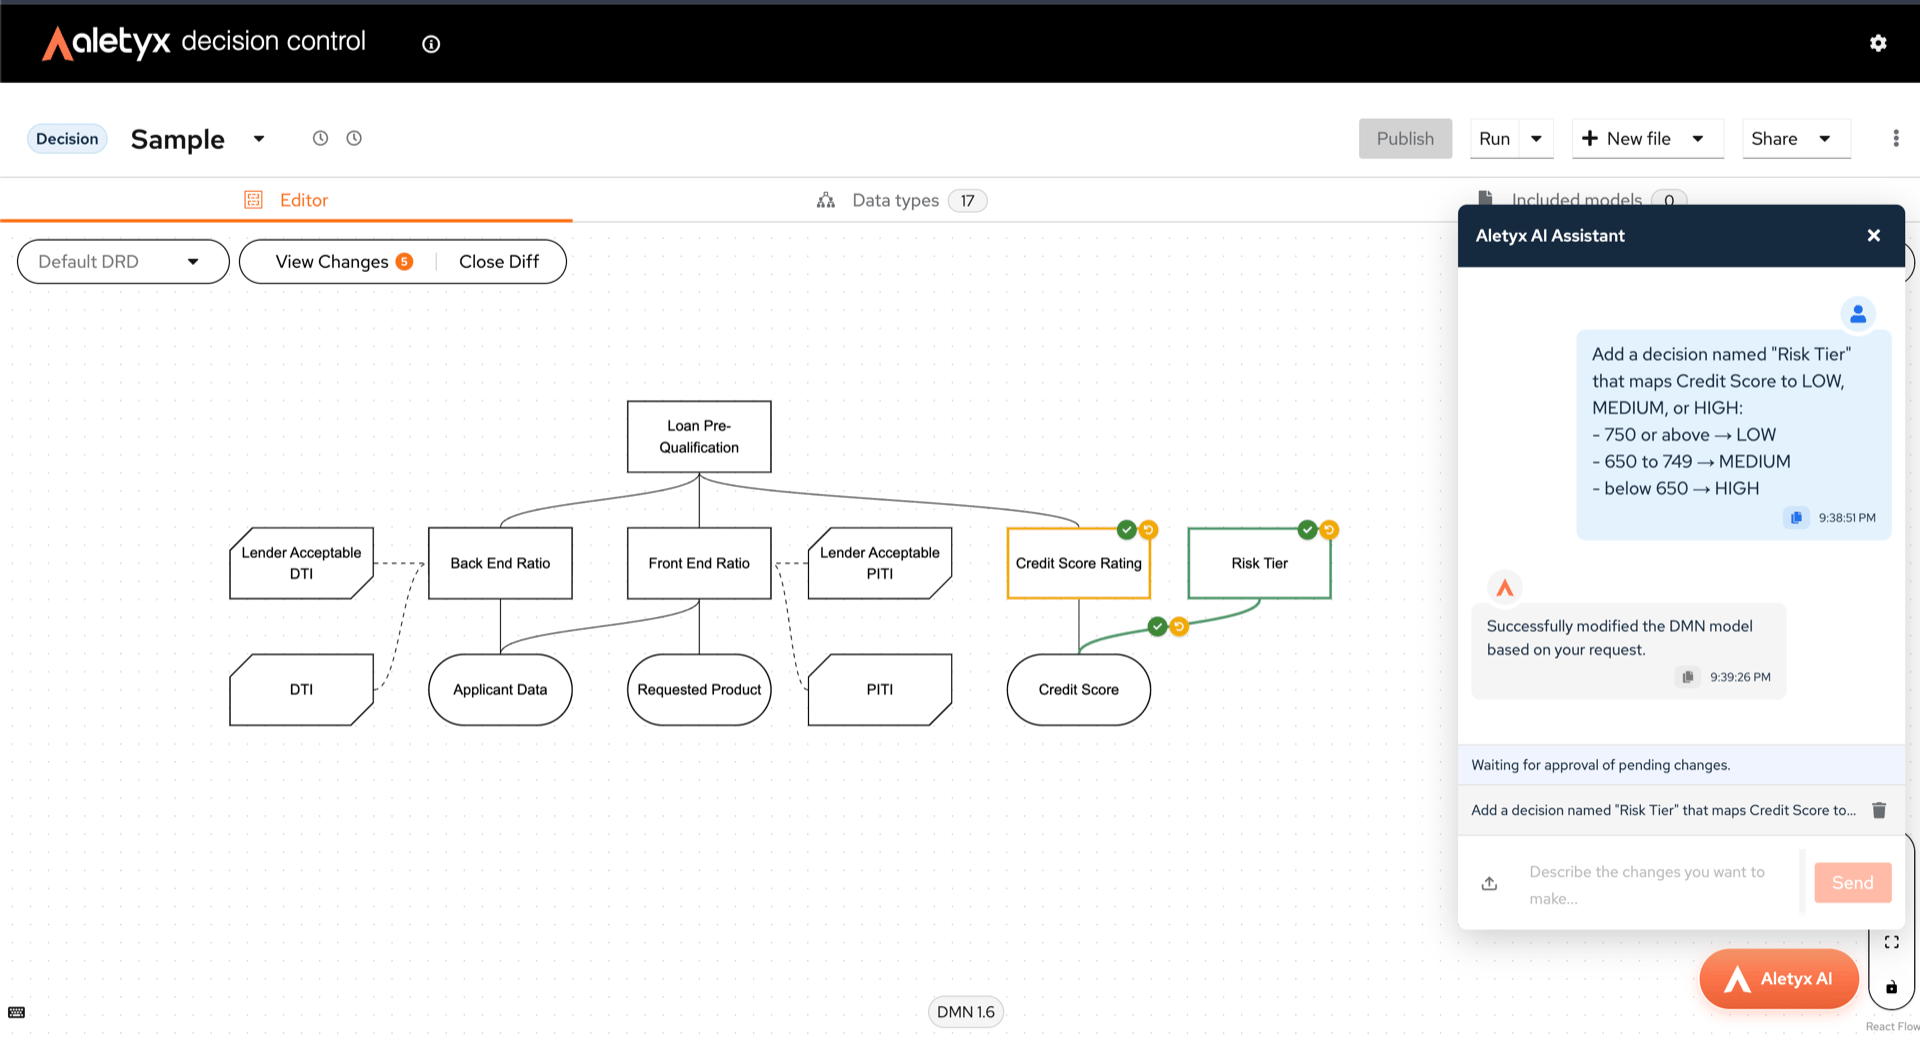
1. Type your request (for example, "Add a decision node called Eligibility") in **Describe the changes you want to make…**.
2. Press Enter or click **Send**.
3. Wait for the response (the editor locks while the model is being changed).
**Verify:** The assistant replies; for model changes, a diff is offered for review.
**Be specific**
Mention the node names, data types, and conditions you want. "Add an `Eligibility` decision using `Applicant Age` and `Credit Score`" gets a much better result than "add eligibility logic".
## How to attach a file to the AI Assistant
Give the assistant supporting documents (PDF, CSV, images, spreadsheets, etc.).
**Prerequisites:** AI Assistant open; file attachments enabled by your administrator; file ≤ 2 MB.
**Steps:**
1. Click the paperclip (attach) button, or drag a file onto the open panel.
2. Confirm the file badge appears, then send your message.
**Verify:** The file badge shows under the input and the assistant's reply reflects the attachment.
## How to review and apply AI-suggested model changes
Approve or discard the model edits the assistant proposes.
**Prerequisites:** An assistant reply that includes model changes (diff opened).
**Steps:**
1. Inspect the diff overlay in the editor.
2. Accept or revert the proposed changes.
**Verify:** Accepted changes appear on the canvas; reverting leaves the model unchanged.
## How to load AI-generated test inputs into the DMN Runner
Move sample inputs the assistant produced straight into the runner.
**Prerequisites:** An assistant message containing JSON test inputs; DMN Runner available.
**Steps:**
1. On that message, click the **Test** button (play icon).
**Verify:** A "Test inputs loaded into DMN Runner." toast appears and the runner is populated.
## How to manage AI Assistant requests (queue, cancel, resend)
Control in-flight and failed assistant requests.
| You want to… | Do this | Result |
| ------------------------------------------------- | ----------------------------------------------------------------------- | ------------------------------------------------------------ |
| Send a follow-up while a reply is still streaming | Type and send another message — it's marked **Queue** ("Next in queue") | Messages run in order, one after the other |
| Remove a queued message before it runs | In the **Next in queue** preview, click the **✕** on the queued item | The message is dropped from the queue and not sent |
| Abort the current request | Click **Cancel** next to "Thinking…" | The current request stops; nothing is committed to the model |
| Retry a failed message | Click the resend (↻) icon on the failed user message | The same prompt is sent again as a new request |
## How to clear the AI Assistant chat history
Wipe the assistant conversation for the current workspace.
**Prerequisites:** AI Assistant open with at least one message.
**Steps:**
1. Click the trash icon in the assistant panel header.
2. Confirm **Clear History** in the dialog.
**Verify:** The conversation empties.
## How to configure the AI Assistant token
Store the credential the in-editor assistant needs.
**Prerequisites:** AI SaaS integration enabled.
**Steps:**
1. Open **Settings** (masthead cog) → **AI Assistant** (or click **Open Settings** in the no-token prompt).
**Required to use the assistant**
All how-tos on this page require:
* **Access:** Authoring
* **Deployment:** the AI Assistant must be enabled by your administrator
* **Credential:** a valid AI token configured in **Settings → AI Assistant**
**History is per workspace**
The assistant's chat history and pending queue are stored per workspace — switching to a different model shows that model's own conversation, not a single global one.
## How to open the AI Assistant panel
Open the in-editor assistant to get help building or analyzing a model.
**Steps:**
1. With a model open, click the floating **Aletyx AI** trigger button (bottom-right of the editor).
**Verify:** The assistant panel opens with a message box; if no token is set, a "no token" prompt appears instead.
## How to ask the AI Assistant to create or modify a model
Describe a change in natural language and let the assistant draft DMN edits.
**Prerequisites:** AI Assistant panel open and a valid AI token (**Settings → AI Assistant**).
**Steps:**
1. Type your request (for example, "Add a decision node called Eligibility") in **Describe the changes you want to make…**.
2. Press Enter or click **Send**.
3. Wait for the response (the editor locks while the model is being changed).
**Verify:** The assistant replies; for model changes, a diff is offered for review.
**Be specific**
Mention the node names, data types, and conditions you want. "Add an `Eligibility` decision using `Applicant Age` and `Credit Score`" gets a much better result than "add eligibility logic".
## How to attach a file to the AI Assistant
Give the assistant supporting documents (PDF, CSV, images, spreadsheets, etc.).
**Prerequisites:** AI Assistant open; file attachments enabled by your administrator; file ≤ 2 MB.
**Steps:**
1. Click the paperclip (attach) button, or drag a file onto the open panel.
2. Confirm the file badge appears, then send your message.
**Verify:** The file badge shows under the input and the assistant's reply reflects the attachment.
## How to review and apply AI-suggested model changes
Approve or discard the model edits the assistant proposes.
**Prerequisites:** An assistant reply that includes model changes (diff opened).
**Steps:**
1. Inspect the diff overlay in the editor.
2. Accept or revert the proposed changes.
**Verify:** Accepted changes appear on the canvas; reverting leaves the model unchanged.
## How to load AI-generated test inputs into the DMN Runner
Move sample inputs the assistant produced straight into the runner.
**Prerequisites:** An assistant message containing JSON test inputs; DMN Runner available.
**Steps:**
1. On that message, click the **Test** button (play icon).
**Verify:** A "Test inputs loaded into DMN Runner." toast appears and the runner is populated.
## How to manage AI Assistant requests (queue, cancel, resend)
Control in-flight and failed assistant requests.
| You want to… | Do this | Result |
| ------------------------------------------------- | ----------------------------------------------------------------------- | ------------------------------------------------------------ |
| Send a follow-up while a reply is still streaming | Type and send another message — it's marked **Queue** ("Next in queue") | Messages run in order, one after the other |
| Remove a queued message before it runs | In the **Next in queue** preview, click the **✕** on the queued item | The message is dropped from the queue and not sent |
| Abort the current request | Click **Cancel** next to "Thinking…" | The current request stops; nothing is committed to the model |
| Retry a failed message | Click the resend (↻) icon on the failed user message | The same prompt is sent again as a new request |
## How to clear the AI Assistant chat history
Wipe the assistant conversation for the current workspace.
**Prerequisites:** AI Assistant open with at least one message.
**Steps:**
1. Click the trash icon in the assistant panel header.
2. Confirm **Clear History** in the dialog.
**Verify:** The conversation empties.
## How to configure the AI Assistant token
Store the credential the in-editor assistant needs.
**Prerequisites:** AI SaaS integration enabled.
**Steps:**
1. Open **Settings** (masthead cog) → **AI Assistant** (or click **Open Settings** in the no-token prompt).
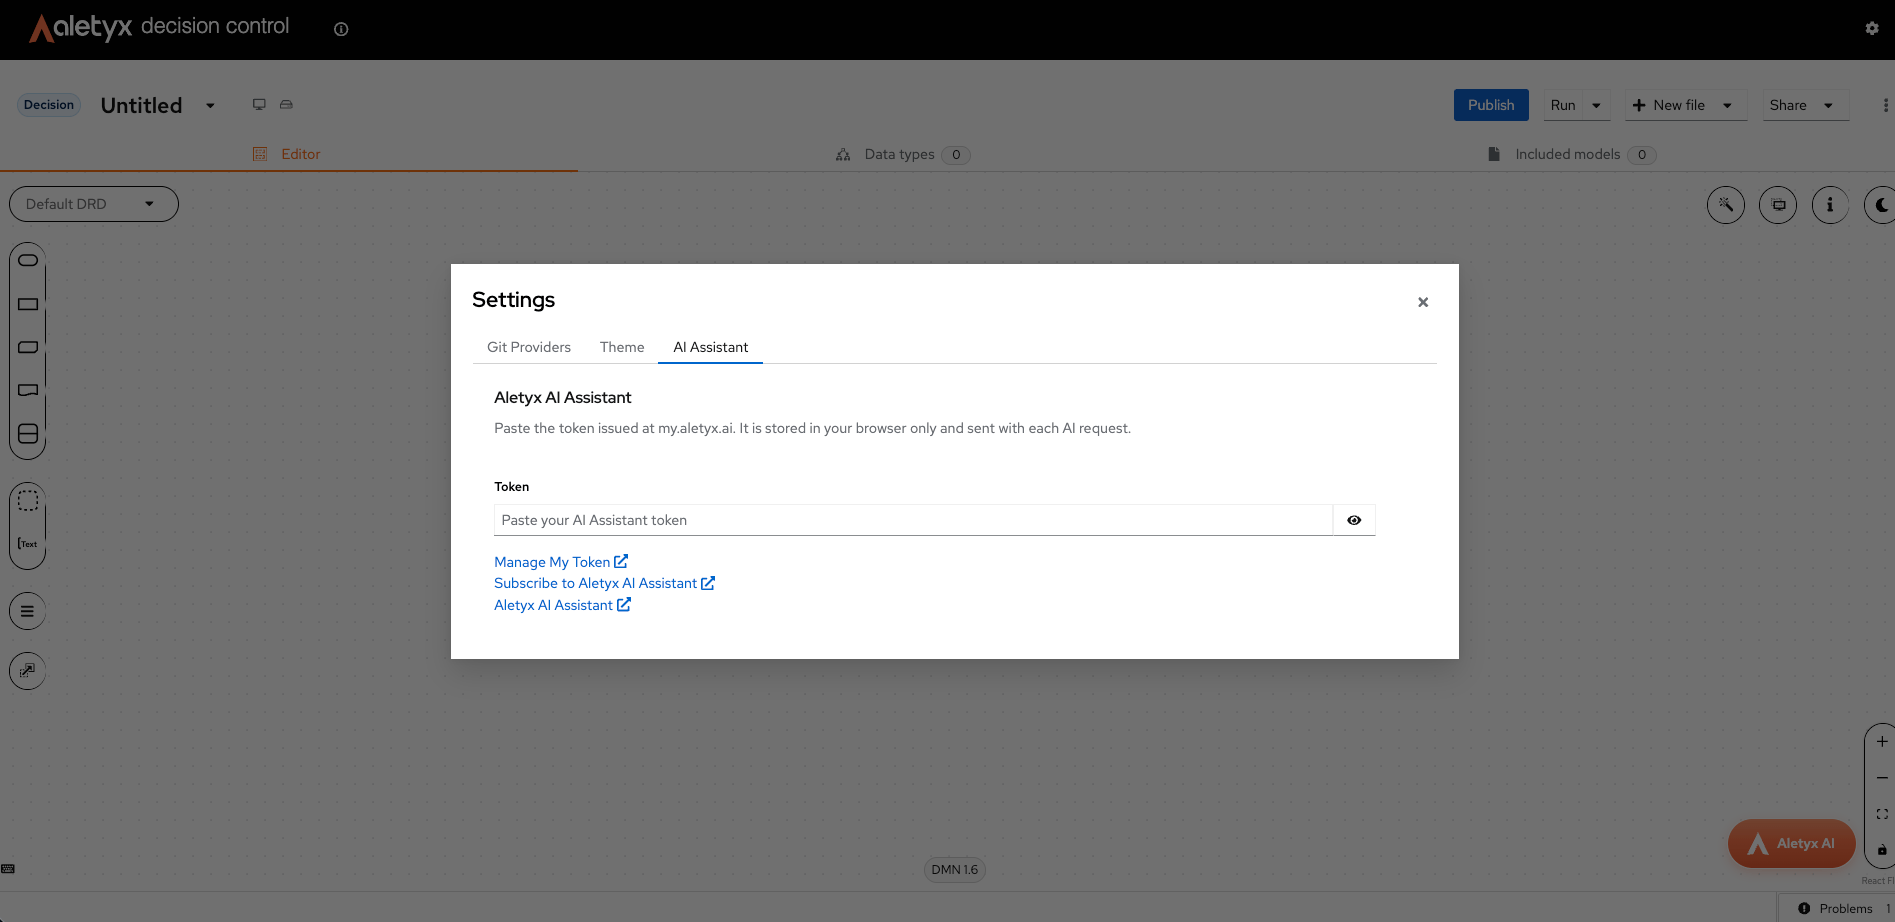 2. Paste your token and validate it.
**Verify:** The token validates successfully and the assistant becomes usable.
2. Paste your token and validate it.
**Verify:** The token validates successfully and the assistant becomes usable.